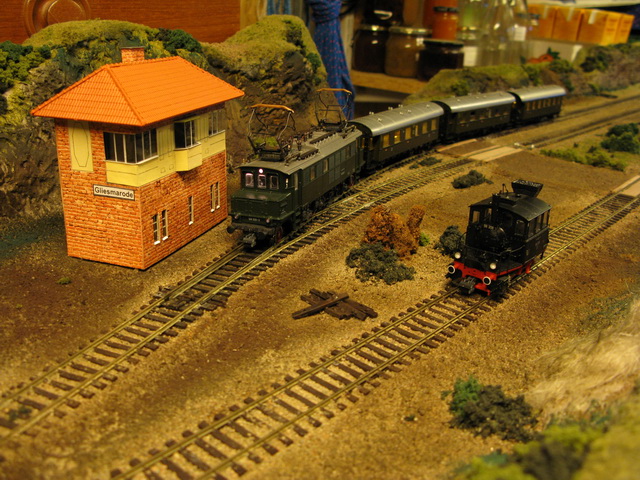
Gliesmarode
Stw Nussberg and Bhf - module(s)
Here you have a bit of backgroundinformation to the prototype that I´m
working from.
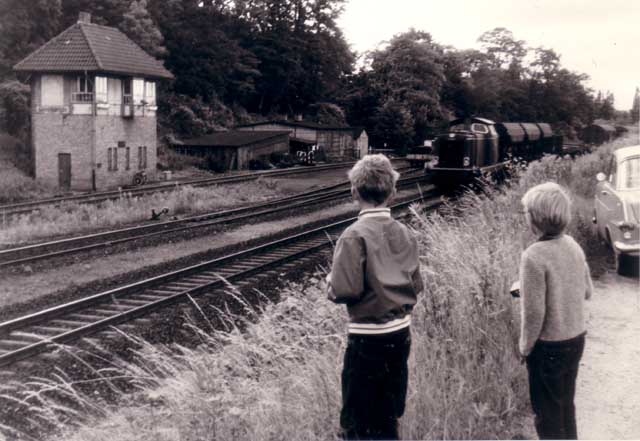
The tower seen to the right in the picture was populated
during day hours by a man that where looking after the track-changes
and semafores. One day I was invited to walk over and wisit the man in
the tower. I in fact helped him to set the semafores using long metal
sticks and wires. You can emagine that this cought my interest for trains...... Here
a homepage in the german language covering the Gliesmarode area.
The two guys in the picture looking at it all are myself
and my brother Michael. Picture taken around 1968.
This module is a tribute to Gliesmarode, nostalgia, a good
startingpoint and a nice discussion topic with my father Andreas. I guess
he is the main person to "blaim" for my interest in trains
and technology...
|
Most
recent update: Jan 3, 2012
Tilman
the module model railroader
Module Model railroading.
Building
your model railroad on to modules is a great way of getting into model
railroading.
Several
reasons for att appeal to me:
1. It does not need that much space. You do not have to have the whole
layout yourself as you only have to contribute to a part of the layout
when
meeting and running big train sets.
2. It is very social. You do not have to sit down in your basement running
them trains on your own. You meet with other people and run multiple
trains together on a big layout.
3. You do not have to do it all. Some people do not like to build complicated
station layouts and are mor inte nice country side scenery. Others are
more interested in getting their hands onto complicated electronics.
So there story goes on. For me module model railroading is the right
thing.
I´m a member of:
MMM "Mälare ModulMöte"
FREMO "FRundeskreis Europeische Modelbahner"
Look here for my upcoming project for H0n3 modules |
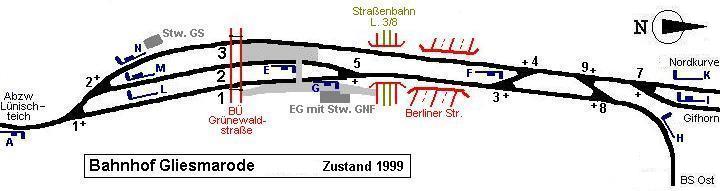
Here you see a layout of the Gliesmarode tracks around 1999. "Stw. GS" is
where the switching tower is placed. The below layout is not matching up the
layout above 100%. The main reason is that I wanted to incorporated a fiddle
yard.
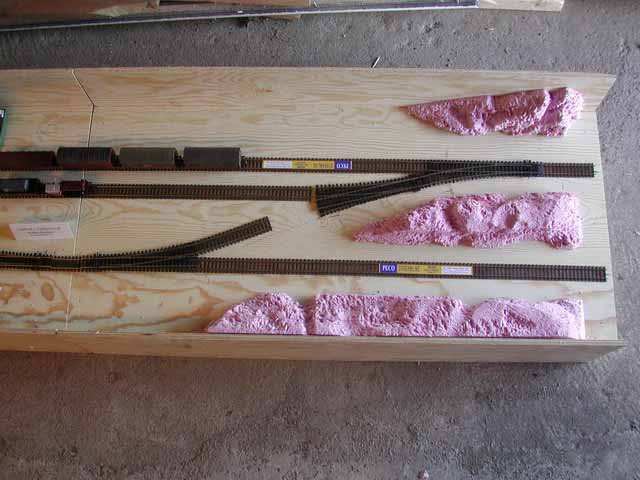
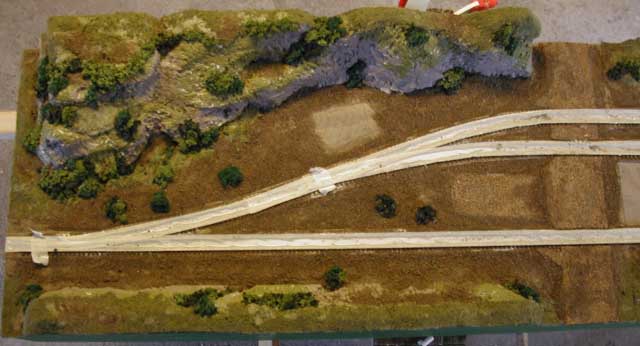
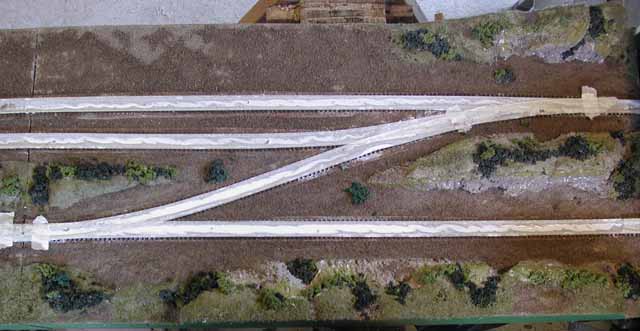
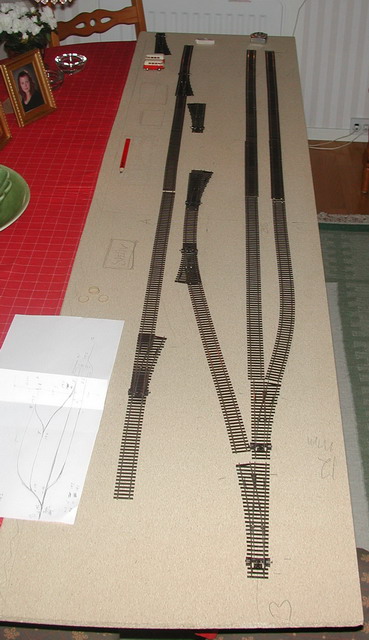
Here you see what the tracks look like. You can see that I have straighten
things out. Remember this is my first ever module so I did not want it to be
to complicated. Realising now that I´m dealing with 4 meters of module,
11 meter of track and 9 turnouts, there is pritty big level of complexity anyway
;-)
Oct 29, 2009
Some housebuilding undertaken. I have had som FALLER-kits tucked away
for to long in a box now. Time to get the EXACTO and glue out and start building
them together.
First out is a freight-magazine as you can see in the picture
to the right. Weathering needs to be done before I can put it into the landscape.
I must say that I managed to get it very nicely built. Remembering in the
old days building these houses. They simply never looked good. But I guess
my skills and tools are better now then 40 years ago...
Next one to build is a workshop and enginegarage. Then a controltower
and coaldepot is to be done. Busy building you can say.
To that I have some new modules in the plan where I can put some of
these houses.
|  |
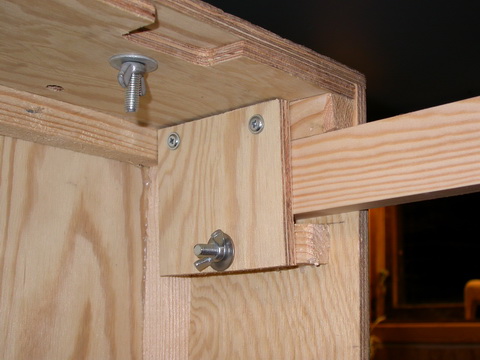
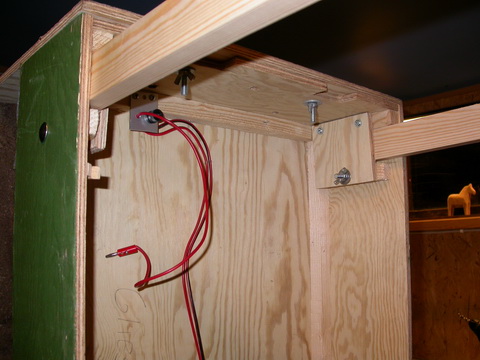
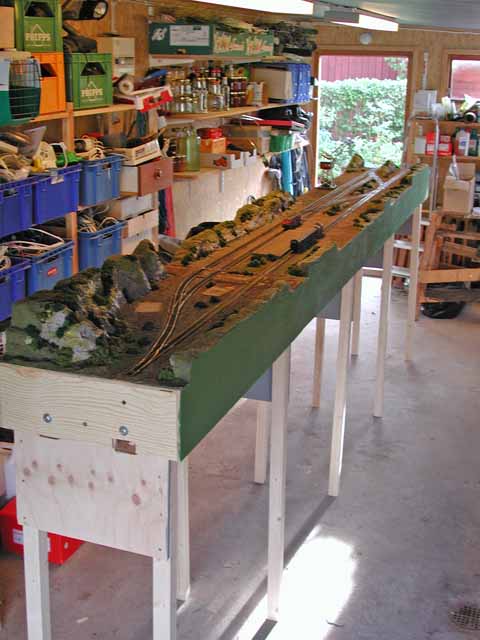
Oct 27, 2009
Got feed up with the bulky legs used for my modules. They just take up
to much space when bringing them to meetings. So now I have redone
my modules
to take up plain "sticks". The legs are now 21 x 43 mm and 126cm long.
They at put into pockets and fastened/adjusted with a screw to even
out irregularities
in the floor.
|  |
Sept 28, 2008
Long time no see here. Dont worry. There has happened a lot with my railroading
and module building. This allthough I have not being updating here for
quite some time. Running up to the yearly gathering in Gävle I have
been very busy with preparing all sort of things. Mainly things around the
electrical
setup, this as I´m responsible for the electrical installations.
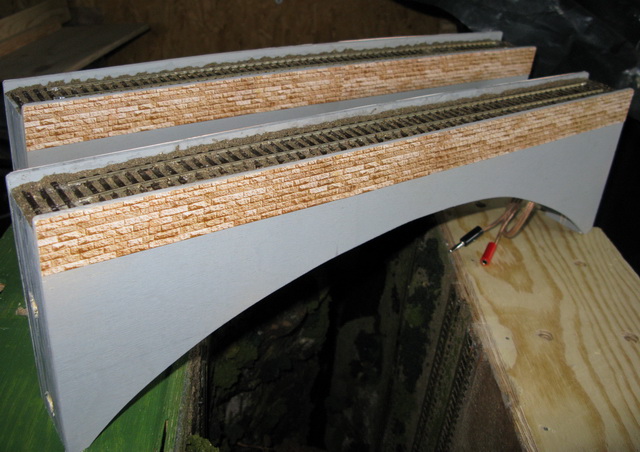
But I have also taken the oportunity to build myself two extra moudels
that I have
had a need for duing quite some time. I needed some extra space from my Gliesmarode
to turn around at the end of that module beyond tha last turnouts in the
end. So now I have combined this need with building two nice bridgets that
can be put into a bigger setup.
The bridges (called "GSM-Bridge") are 50cm long and 5 cm wide. Built out of wood but that illusion schould be that they are mad of concrete with a wal on top. The tracks are put in gravel. Teh electrixal and mechanical design is fully compliant with the MMM-standard.
|  |
Feb25, 2008
Today I gave it a go with the paint on module. Calling it a extreem
makeover would probably be a bit to much. Anyway, the module sections
look quite different from before where they had a grey glossy look
to it. If you look at the pictre below you see what I mean. Look to
the riight and you see how thing look like now. A mix of brown, brownish
and green colours are now brushed onto the dirt, rocks and ballast.
Being a newcomer I must say that I´m quite pleased with the result.Of course
there are still quite some areas to sort out. But I do not want to overdo
things.
|
 |
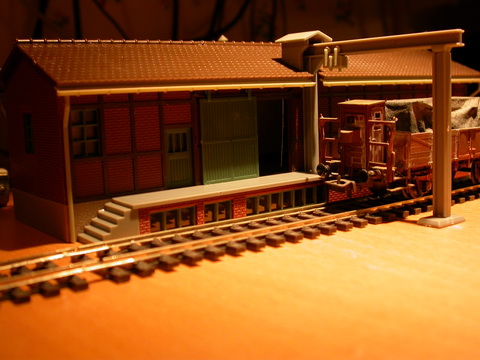
Jan 10 2008
Some weeks ago i helped modulmaker Per Rundblad with the complete elektrical
installation on his modules. Per beinga very skilled housebuilder then helped
me building the most lovely model of the switchouse in Gliesmarode Nussberg.
In the picture to the right the house placed on the module and having a "Glaskasten" steamengine
passing by. Sharing knowledge and healing each other out are really strongpoint
with being a modulebuilder. Compare the picture with the
one above.
Per has built a lovely station with the prototype being Balingsta station
from the Uppsala-Enköping railwayline. You will see his lovely station at
this years MMM-meeting at Stockholm Technical museeum. |
 |
Dec 1 2007
The MMM-team will be participating in the yearly "hjulmarknad" Dec 1.
Gliesmarode (section 1 and 4) will be participating together wit a number
of fellow modules. MMM is there to market and show the module-concept. I
hope that we meet. |
|
Oct 2007
I had the great oportunity to participate in the annual meeting at
the Swedish railwaymuseum in Gävle. We had a great time and did build
a layout with about 150 meters of tracks. My module Gliesmarode also
joined. Radio, TV and magazines where there to pick up notes for press.
A lovely team, all working hard to give the visitorns to the museeum somethin
interesting to look at.
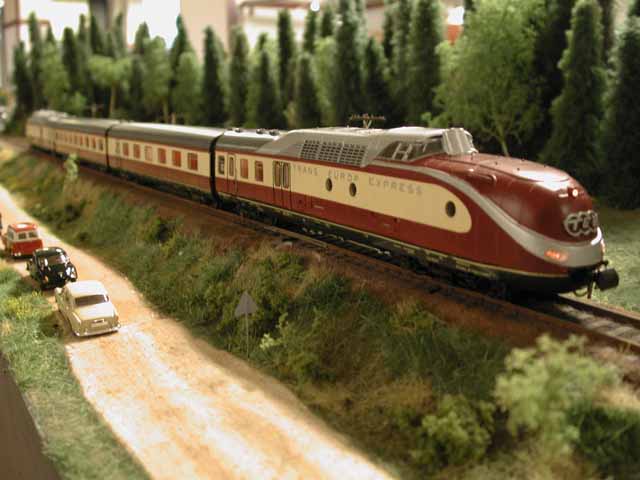
We held an auction of train material after our late friend Anders Kjellander.
I did put a bid on the lovely TEE-train to the right in the picture. So
I now can not just be happy about this train. But I can also make shure
that Anders trains will continue running on the modules he worked so hard
for.
I have now (Nov2007) also installed a sound module in the train. So you
can emagine that sounds lovely running down the tracks..The sound module
is from LOKSOUND in Germany. |
 |
Sept 15, 2007
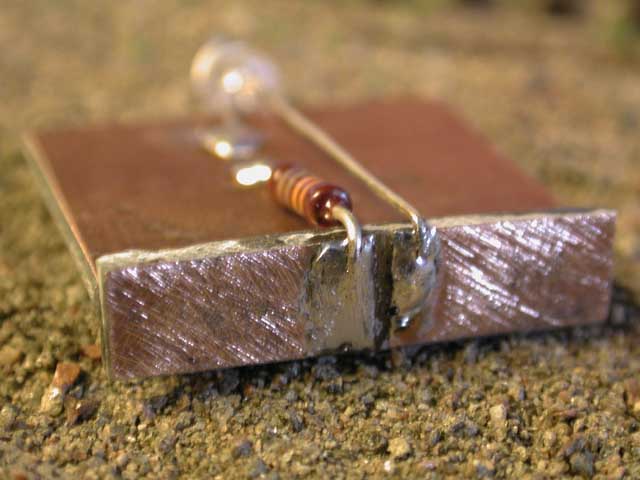
Today i made myselt a very simple tester for my trackwork. I kinda got
sick of not having DCC-current in the tracks. All needed is a LED and a resistor
(330Ohm) in sersies to measure. I soldered it to a stand, that itself is
made out of two pieces of PCB-board soldered together. You can see how it
soldered to the bottom of the stand. Here you also see that i have made a
notch in the middle. Cleaning up the copper is handy to get a proper connection. Not
shown in picture is a diode (ex 1N4148) that is put in reverse to protect
LED.
 |
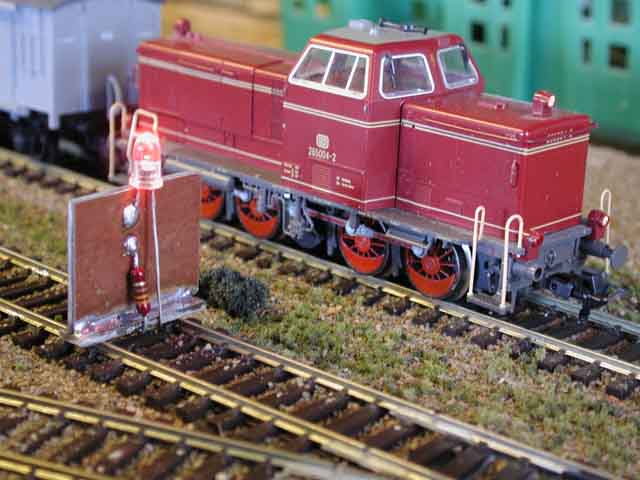
Here you see my V65 passing the tester with a lit LED. |
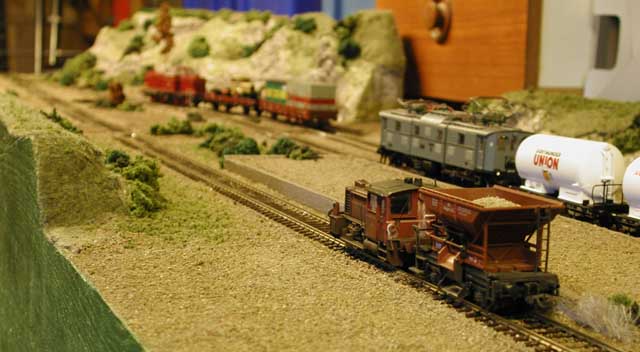
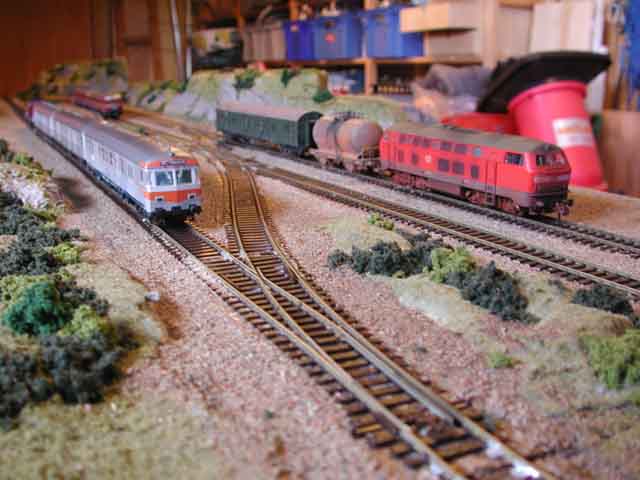
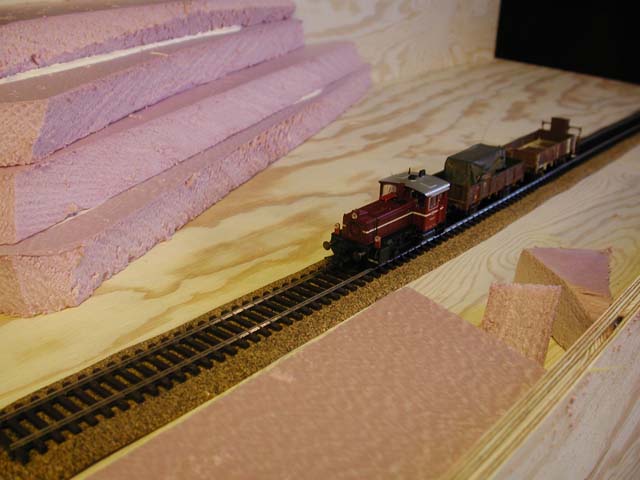
Sept 9, 2007
Just to give you all a heads up. Lots of action on the module underway.
Grass is growing and plants are placed all over. I have been cleaning tracks
from glue and grit. Also lots of small adjustments to the tracks so that
the passangers and fright will have a smothe ride trough Gliesmarode.
As
you can see from the picture some trains are passing by to test eveything
properly. In the back there is a V65 with some freight cars. The good old
E91 is hauling along a line of beer-tank-cars for the thirsty workers. And
in the front a KÖF is passing by with a load of ballast to ship for
adjustments. Click pic for bigger. |
 |
Aug 25, 2007 It passed the test !!
Today my module(sections) joined up with MMM-builders modules in Solna.
We hade about 30 to 40 meters of track and my module Gliesmarode was
part of it all. We hade quite som tricky locos passing and all went smothe
after some tweaking. But of course, Gliesmarode hade been passing all
the heavy
testing at
home.
So I was not overly surpriced that it all worked out;-). Thank you guys
in MMM, I´m
now ready with my module for further decorating.
In the picture you can see how Anders L is fiddling with is module - cleaning
down some ballast. I connected even up my LENZ-central and Booster to
drive the whole network for a while. So all is tested and dusted now.
Boy am I pleased! |
|
Aug 21. 2007
I have been hard working with cabeling and fiddling with loads of bits and
pieces. had to ceonvert my LV101 for common ground to the MMM boosterbus.
I connectedt up a cable to the monuse-pole of the Diode-bridge for external
connection to pin 3 of the boosterbus XLR.
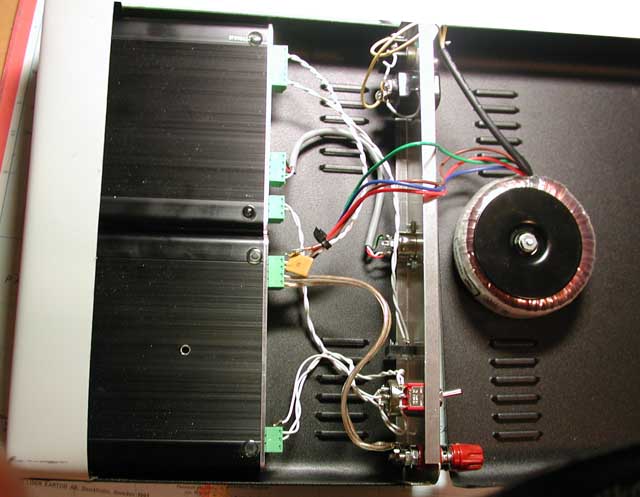
I have also pulled the LZ100 and LV101 together with a toroid mains transformer together into a cabinet. Looks tidier and more serious having outigns with the MMM-team. There are all the connectors for the MMM-standard. I have also a connecter where I can connect up a small piece of track for to program loco-adresses.
The transformer is bolted to on side and the LENZ-bars to the other. In the
picture you see the cabinet opened up. In the middle if the picture you see
a small brown component. That is a automatic fuse that will disconnect and
protect the transformer in case of overload. |
|
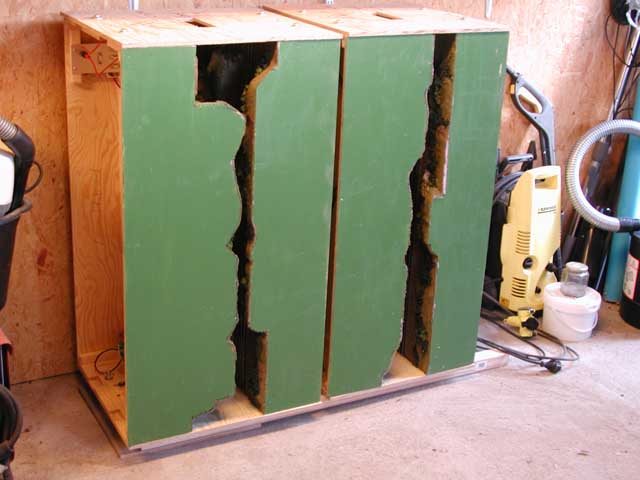
Aug 13, 2007
Today I have made boards to mount 2 sections each front to front for stowing
away and safe transportation. From the very beginning i decided that teh
sections for my module should be stored and handled this way. I got this
idea from fellow MMM-friend Seth Olofsson (thank you for that). I have not
yet made a proper plastic sheet to cover the sections all up. This so that
dust does not get trapped onto the modules. The footprint of the four sections
tucked away this way is about 48 x 110 cm.
Now I have some small bits to deal with before I can take my modules for the upcoming MMM-meeting in Solna Aug 25-26.
|
|
Aug 11, 2007
A couple of detail pics from the module. I have placed two LENZ LA152 panels
into boards that can place with a wrench to the side of the modules. Doing
it this way
I do not have to fix the LA152 panels into the module. So I be flexible
on where they are placed. A important feature with this is also that I
get a
small board where the driver can place the controller. Rather then putting
it on the module and ruin the layout..... !
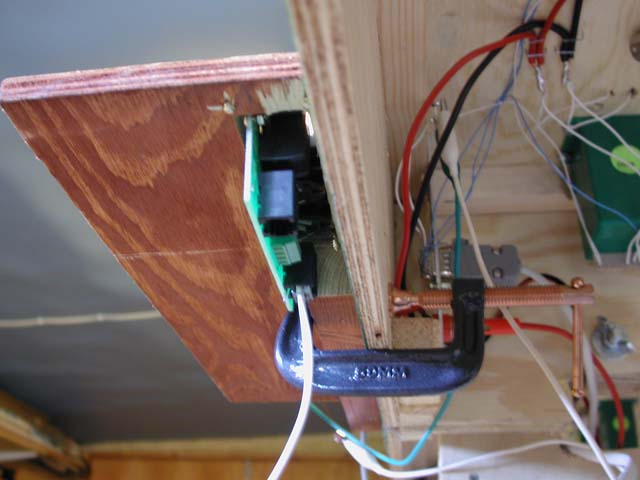
Here you
can see how the wrench tucks up the board to the module side. You can also
see how the XpressNet cable with its RJ12 connector is connected to line
up the bus structure. . |
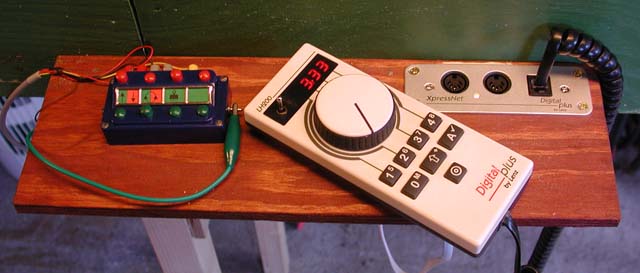
Here you can see that the cabcontroller is sharing space with the controller
for my 7051 Märklin crane.... Nice feature on the module...
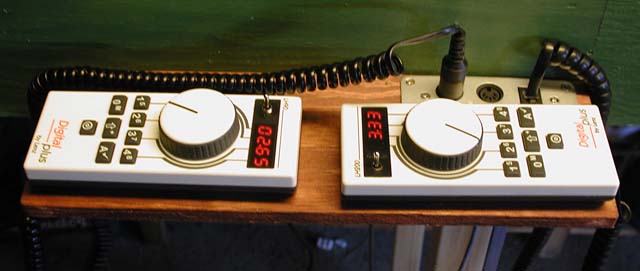
There
is enought space for two controllers to be placed side by side on the little
board. I hate it when people drop their controllers in the layout. It
might ruin all the
hard work with building the layout. |
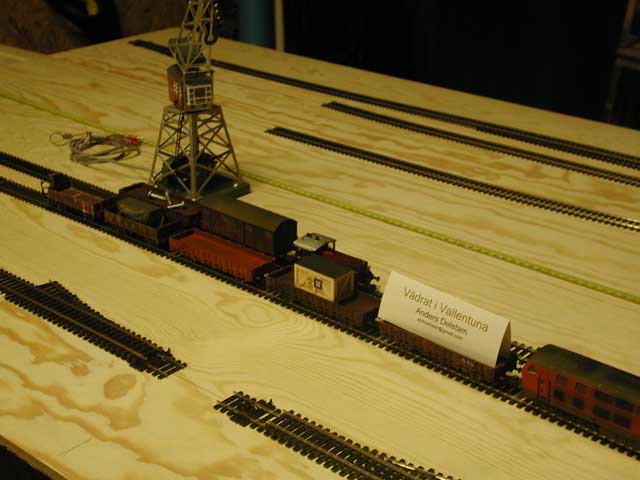
Aug 6, 2007
Here I´m more then 30 years after the picture was taken of me and
my brother, working on my module model of the Gliesmarode layout. A railcar
has just entered
the
Gliesmarode
station. A BR290 has backed up a couple of freightcars and a BR215 is
moving around with a ROCO cleaning car. The KÖF switcher is also
moving around a emty oil-car. As you can see the Märklin 7051 crane
is ready for action. Am I happy? You bet.!! |
 |
Aug 3, 2007
Finally!! I made it to the first turns on the module. DCC is connected, turnouts are controlled. Time to put locos and railcars on the track and give it a go. Everything went down nicely, a couple of adjustments and cleaning of tracks where needed though.
Yes I´m extremly happy that I finally made ot to get my first MMM-module
together. Now in retroperspespective I would have been better off starting
with a smaller project and not that many turnouts. On the other hand, I´m
not afraid of electrical challenges. I have learnt a million and I´m extremly
greatfull for all the good advice from fellow MMM.builders and my colleague
Anders in the office for all the nice advice around modelbuilding.
My module Gliesmarode is not 100% ready yet. I have more
landscaping to do. Dust, sheds, houses and lighting will keep me busy for
another couple of weeks and months.
Im ready now to put my module into MMM-events though!! |
 |
Aug 1, 2007
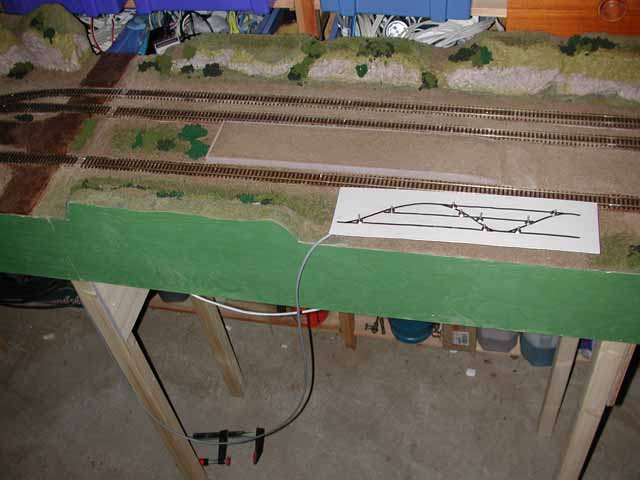
Today I have made a switchpanel for the tournouts. From the picture to the
right you can see that there is a box missing around it still. I wanted to
try out functionality before boxing it up.
I had to do some thinking to get all the turnouts moving
in the right direction versus swich setting. Everything came in very
nicely after a minor tweak.
You can see the grey cable going out of the box to the left connected
up to the far left section (section 1) where the distribution
and mains transformer
is placed. (see also picture below).
The panel needs to be "boxed up" and
then next step is to DCC-power the module. And off we gooo!!!! |
 |
July 28, 2007
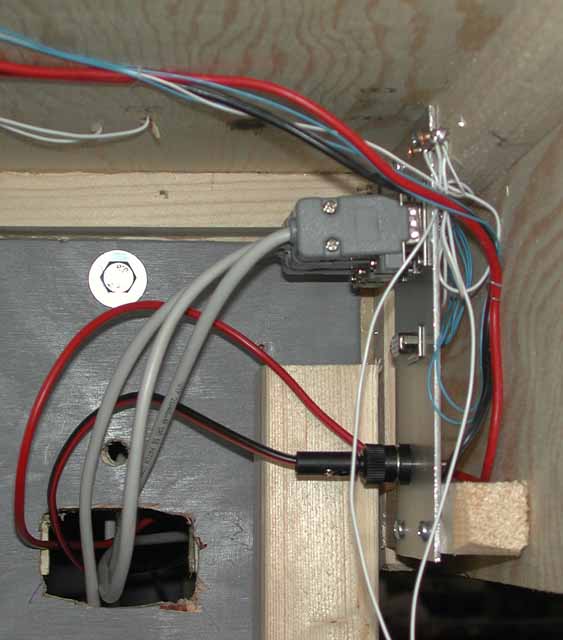
Today I have got all the wiring done on all 4 sections.
From the picture below you see the wiring in section 1 where the wires for
the turnouts on the other sections terminate. To the right in the picture
you see the aluminium board that holds the chassies D-subs and the red/black
cables for the DCC-current. In the moddle (to the right) you see a a 15 pole
D-sub that is to be used to connect up the control box.
 |
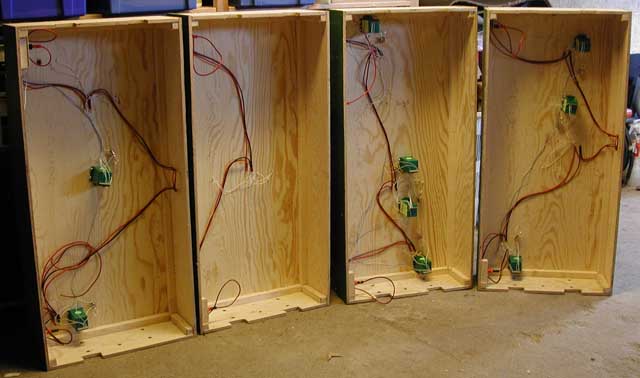
The sections 1 - 4 (left to right) are here all wired up with the Tortoise
motors installed. All sections are to be interconnected using 8 wire cables
and 9 pole D-sub connectors (see picture to the left). In the picture you
do not see cabling for 220VAC mains, booster and Xpressnet. |
July 23, 2007
Looks like there has been no action for a while. That is right in a way.
I did spend a week of holiday in Italy with my family July 14-21. Really
great and pretty hot with about 35 degrees C every day. Anyway, back
to modulemakingaction again. Yesterday and today I have spent with adjusting
some parts on the layout. Also legs have been made and holes have been
drilled to srew the modules together according to standard. I made
some misstakes, but not worse then that they could be adjusted during
the way. The legs are designed so that i can nestle them all nicely together
in a flat package for transportation and stow away. The normally used
legs (IVAR from IKEA) are using up to much space, so I decided not to
use them.
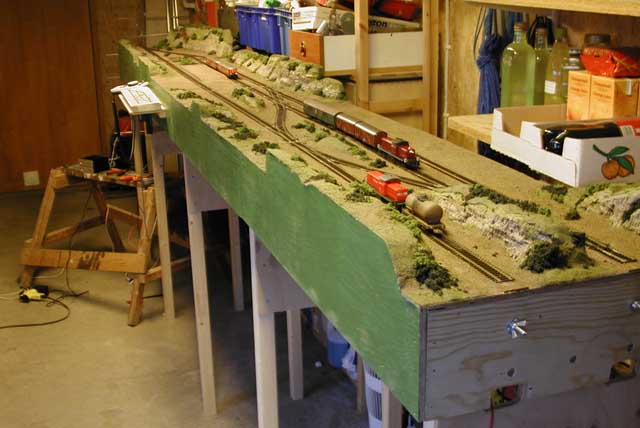
As you can see from the picture to the right all modules where
put together
and again I have tried the alignment and the trackability with a couple
of waggons. Everything runs very smooth. If you have a very close look you
can find a Märklin 7051 electric crane (red house) on the back end of
the third section of the module.
The sections are now separated and it is time to play around with the electric
parts on the underside. Great fun !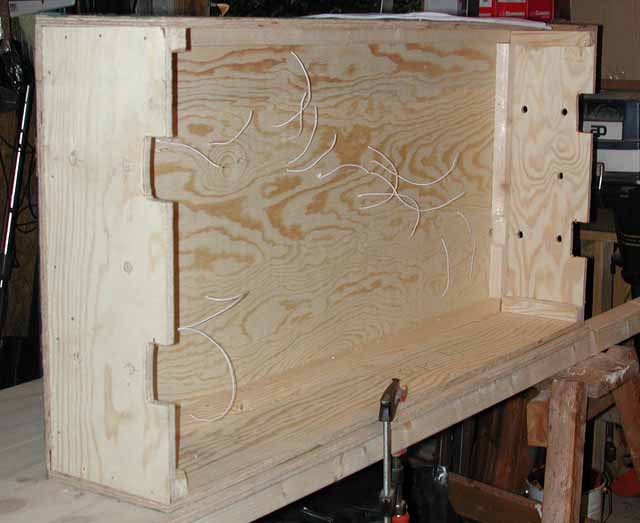 |
 |
July 13, 2007
I could not resist it this morning. Tape went off and the rolling stock
was placed on the tracks for a shooting session.
Here you can seet a BR290 is pulling a "Silberling" train down the tracks.
To the right a BR215 tries to pull along with some freight cars. Click for
bigger picture. |

In
the picture you can see that the railcar has stopped at the platform. Only
thing missing here are the passengers. But right now We are only trying
out things here. |
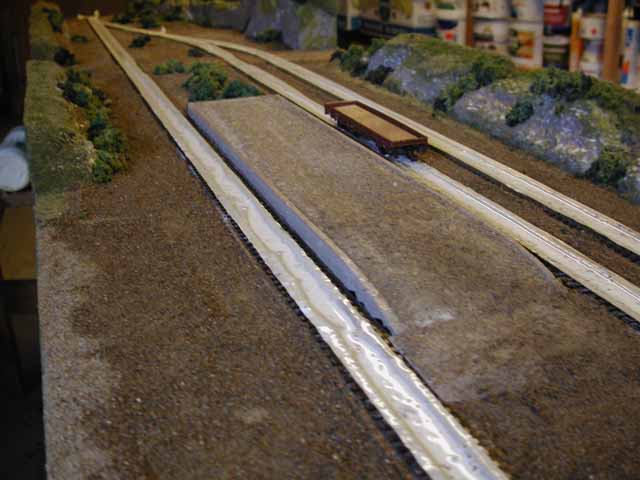
July 12, 2007
Today I had another go with the platform for the stop att Gliesmarode.
Bearing in mind that the station was (and is) used for local trains stopping,
I decided to go with a simple and short platform. Out of foam I made
a frame where I did put a thin layer of gravel. With the platform I now
have covered the whole area
also
on part 2 of the module. In the picture you can see the platform shortly
after applying the glue cement. Therefor it still looks quite messy.
You can see that I still have the covering tape on the tracks. I have placed
a waggon beside the platform for the photo session, to get a feel for
proportions.
The whole platform is 50 cm long and will therefor nicely pick up a
double set of railcars.
Lovely! I´m very pleased with the result. |
|
July 10, 2007
So here we go again. Today I had really fun out there in my workshop. Before
going for the messy part i did put loads of bushes all over the place. I
found out that it should get more busy in places here and there. After that
I did start to try out a resonable method to put turt besides the tracks.
I tried on a small piece of board. had a quick chat with MMM-friend Seth
Olofsson (thank you!) to discuss blending of the cement. And then off you
go. Dirt all over the place. No clean spot. If you have not
tried this yet I can tell you that is really great fun. One golden rule
for you - DONT BE SHY! Go on a use all your fantasy and suitable tools you
have around.
Then put down some "whet water" (water and a drop of soap). All wet and then
it is time for a mix of water glue and alcohol to make all the stuff sticking
to the module - even if you turn it upside down. Pictures below where taken an
hour after all work was done. It looks really nasty right after you have showered
all teh water and glue (Cement) to the modules. In the pictures all has somewhat
settled quite a lot.
 1
1
 3 3 |
Here is a view over part 3 towards part 2 of the module.
I have taped
the tracks until I put down the ballast. Therefore the tracks look a
bit funny.
Click the pictures
to get a bigger view.
 2
2
 4 4
|
July 9, 2007
Speakermat was applied all over the place a week ago. Now I have colorued
it and the foiliage is been placed all over the modules. Some grass was also
applied to try it out.
I have
put tape over the tracks to cover them off until I will be putting ballast on.
I will let the stuff dry out before I will be putting dust and gravel out
on the greay areas in the pictures.
 |
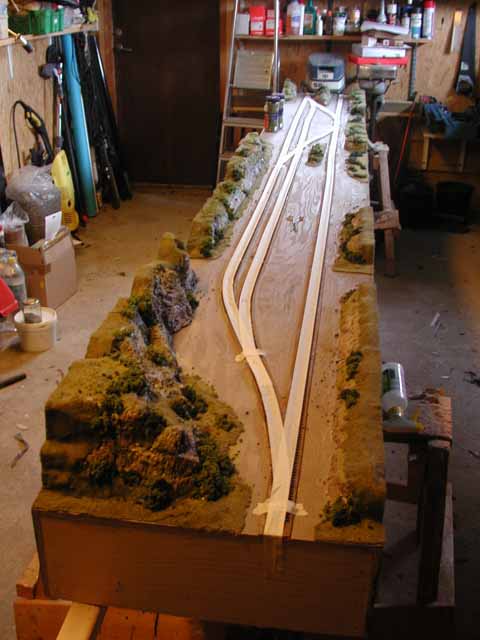 |
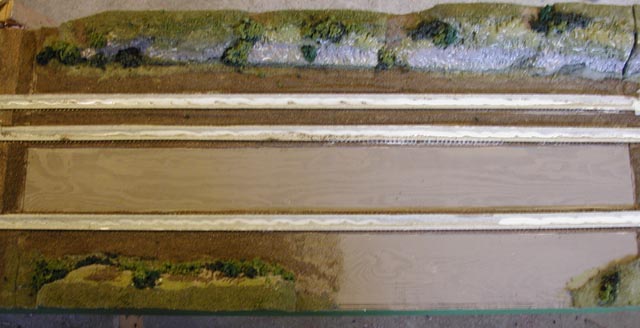
| June 30, 2007
Finally!! All the tracks and turnouts are now glued to the modules. Lots of
wires are soldered and tracked to the underground ready to wire up for connectivity.
In the picture to the right you can see all 4 modules after each other. I
have used more plastic rail joiners then I had expected. This as there is
a need
to split up the modules electraically in the middle. I have been implementing
that feature in modul 1 and 4. In Module 2 and 3 I have not implemented this.
These are modules are in the middle and will always be disconnecable by the
surrounding modules 1 and/or 4. In the middle you can see the paperbag (white/blue)
that shows the position of the platform for staton Gliesmarode. Two tracks
will be available to bring and pick up passengers.
Time now to turn for the work with dust, grass and decorating. And
then the fun starts with the electronic wiring on the underside.
I also have some houses to build and place to get all set and done. As you can see in the picture to the rigth I have tried to run all the
tracks and tournouts with a 2 axle waggon. Some minor rought edges have been
adjusted and now it runs down them tracks without a problem. |
 |
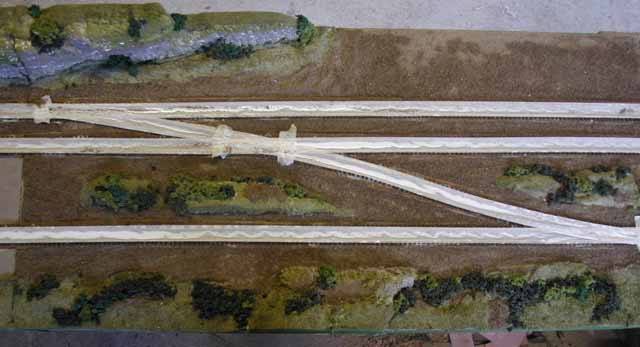
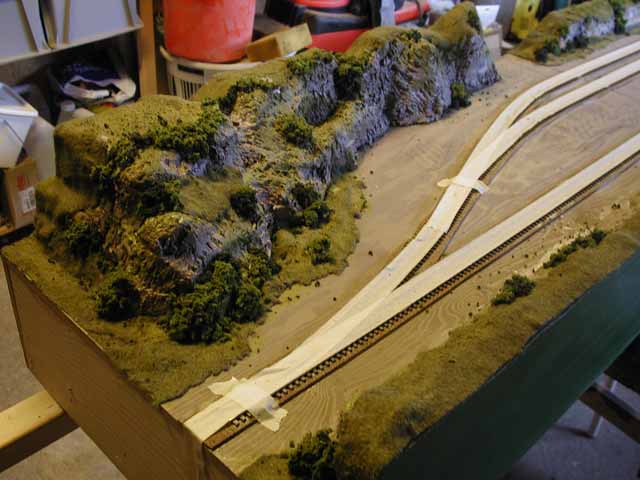
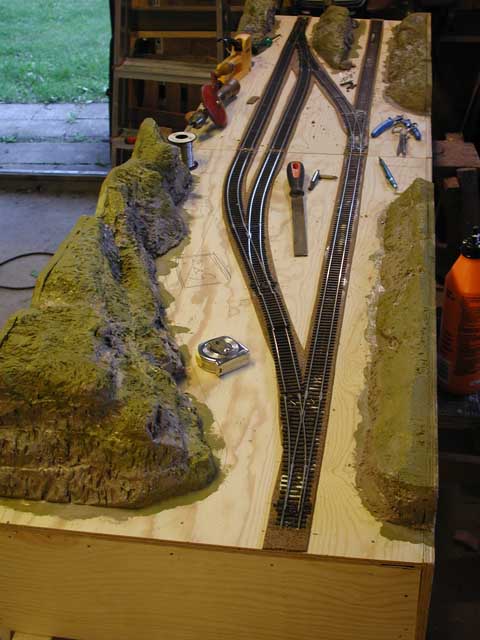
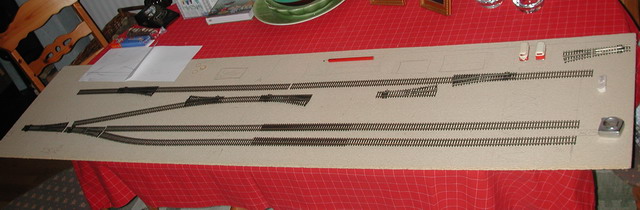
June 27, 2007
Today I finalised some bits on the modulecombination 1 and 4. After that
I lined up module 1 (front) and 2 (back) to lay tracks on module 2. Now
the track-location was correct so that the tracks on module 2 would line
up exactly. As you
can see the three tracks are all straight. I had to extend them though
as the PECO Flex tracks are about 90 cm long (the modules are 100cm...
).
Next step now is to lay tracks on module 3. This is done by lining it
up between module 2 and 4.
Remember module 4 has been aligned to module 1. This enables me to use
either all four modules or only module 1 and 4. Depending on how much space
there is in the total layout.
As you can see, we have progress in the construction work.
More to come.
So stay tuned. Soon you will se grass, dirt and gravel appearing on the
modules. |
 |
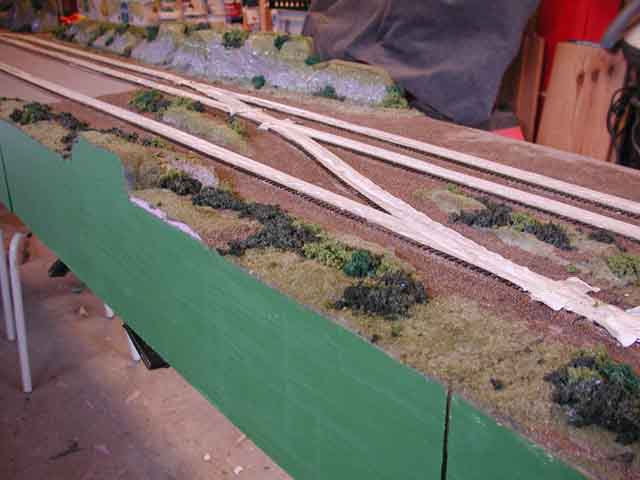
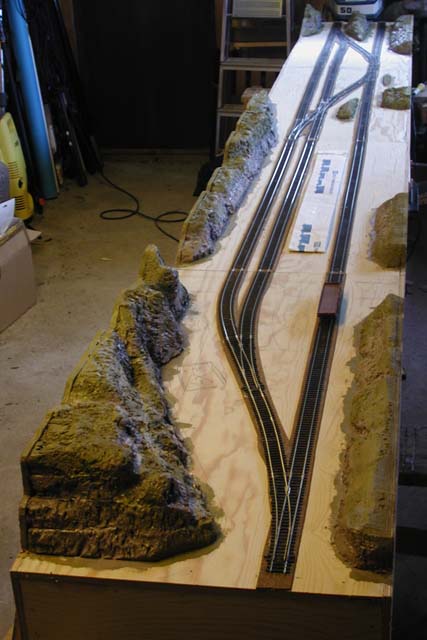
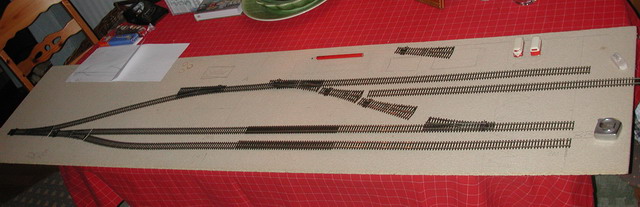
June 25, 2007
Construction work with the tracks is well
underway. I thought I give you a glimpse into how things look like in my
workshop.
As you can see, the turnouts are all placed (here only 2 modules shown).
They are all converted into DCC-friendlyness. The cabling has been routed
trough holes in the board to the underside.
Here I have joied modules 1 (front) and 4 (back) to make sure that they
line up correctly. You can wagely see the cut between them modules where
the
cordless
drill
stands. When that is done i will line up module 1 to 2 and then finally
line up 3 between 2 and 4.
By doing so I know that the whole module parts are aligned correctly and
can be used either all together or only two of them.
Internally within the module I joint the track using the FREMO-recommendation
(end to end). So I will not be needing to fiddle with short track joiners
as per the MMM-standard.
I´m still a bit nervous doing major faults that I will regret and/or
needing major rework. The tracks and turnouts are all glued to the railbed.
I have
used a tacker to temporarely stick the tracks into place until glue has
dried nicely.
Thats all for now. Stay tuned, holiday season is coming up. |
 |
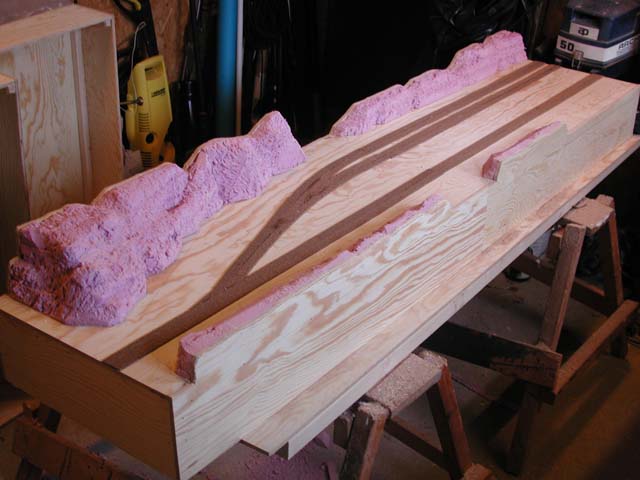
June
1, 2007.
Here you see in the picture (module part 1 and 2) that all the cork is layed
and I have
cut
down
the sides. Now it is time
to
lay
the
tracks
and
start decorating
it all. I have also decided that i will aim to get it all ready by the big
module event at the Svedish railwaymuseeum in Gävle in October 2007.
So watch this space.
May 27 2007 . Have been cutting down the foam today. The modules are numbered
1 - 4 from top left to down right.
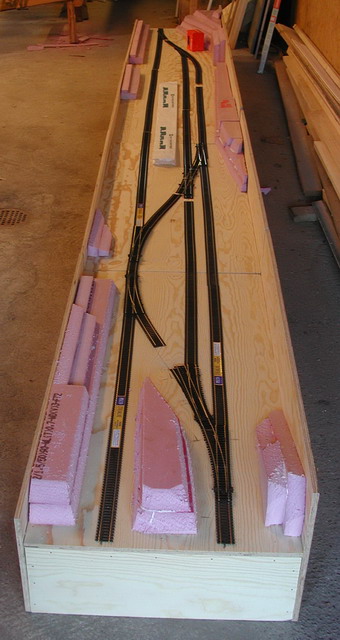 |
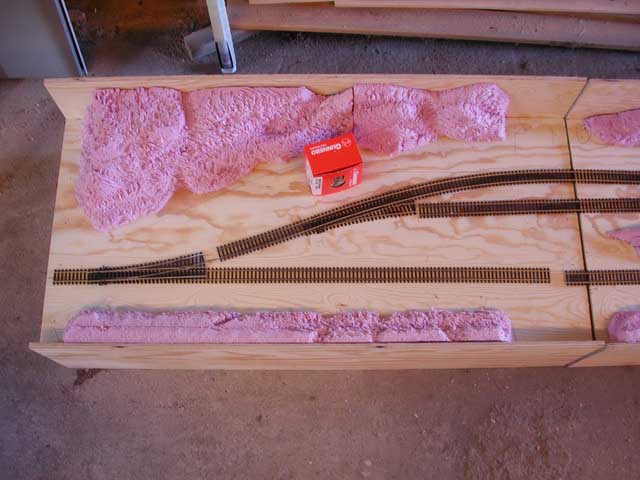
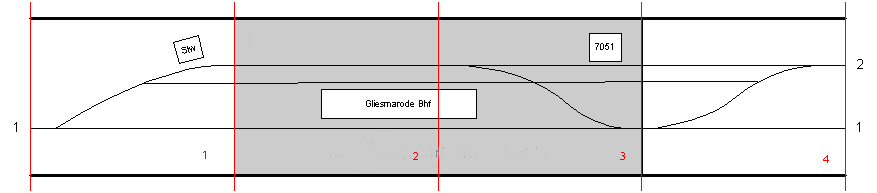
To the left you have the module layout all
lined up on the garage floor May 26 2007-
I have numbered the modules 1 - 4 with number 1 on the top in the picture.
They are all 1 meter long, so in total you have 4 meters (48 cm deep).
Module 1 has the track coming in 14 cm from the front. This is
track position 1 as per the MMM-standard (read
spec
here). If you have a close look in front of the light red "hill" you
see a red box.. This is where the switching house will be placed.
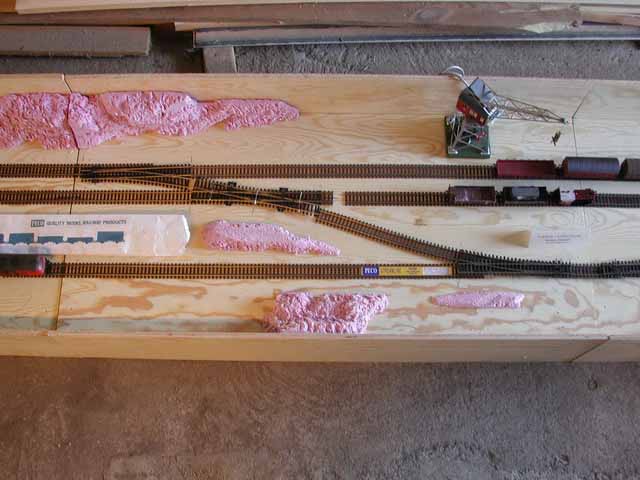
Moving forward onto module 2 you see a PECO flex-rail paper bag that is there
to illustrate placement of the station platform for Gliesmarode station. The
cutover between module 1
and 2 has the MMM-track defenitions 1 and 2a. The distance between track
1 and
2 is being 200 mm. The track between 1 and 2 is placed 56mm to the left of
track 2. The station moves over into module 3. The cutover has MMM-track defenition
1 and 2a.
On module 3 you also see the beginning of the "fiddle yard" that will be having
room for at least one Märklin 7051 crane. The cranes will be placed to
the right of track 2. One or two simple sheds will be around her also to cover
up a illegal spririts factory. The mysterious chap Heinz and his equally mysterious
partner Björne (the bear) runs this business on the side.....
The yard moves into module 4. The tracks out of the complete module has position
1 and 2 as per the MMM-standard. Track 2 can be terminated in a block if not
matching up with the next module.
The front ant back of the modules current has lifted boards. They will
match up and streghthen the foam for the hills. The boards will then be
cut down to match the hills. The foam is cut off and glued together.
Stay tuned for more development. Also, your comments are highly appriciated.
Pls direct them to: sm0jzt (&) ssa.se
/ Tilman
|
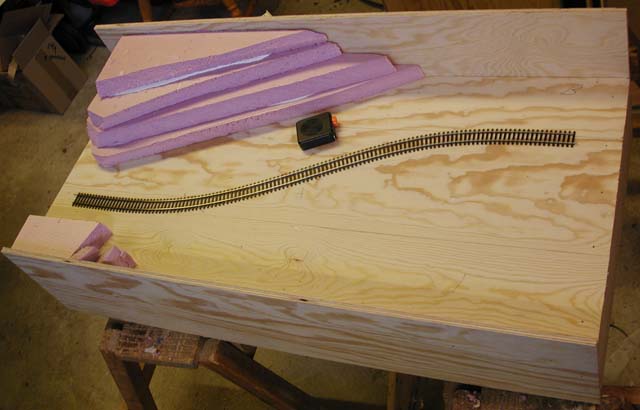
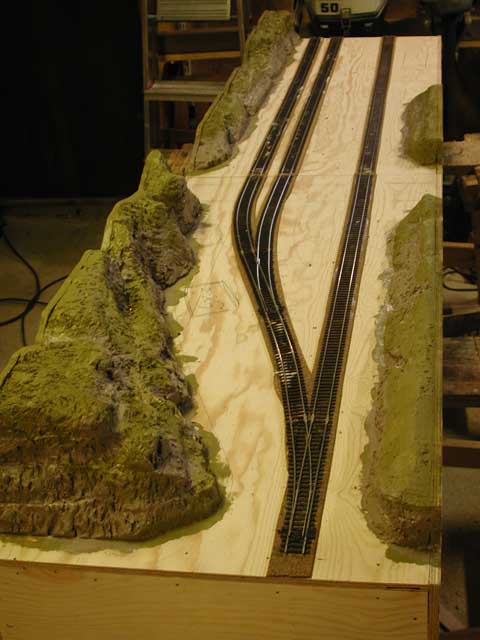
Here you can see that I have started to work (May 21) on the
first module. The light red plastic is going to be modeled into part of the
hilly
area on the back end of the module. The Swiching tower (Stw GS (Stellwerk Gliesmarode))
is going to be placed around the black metering tape in the picture to the
left.
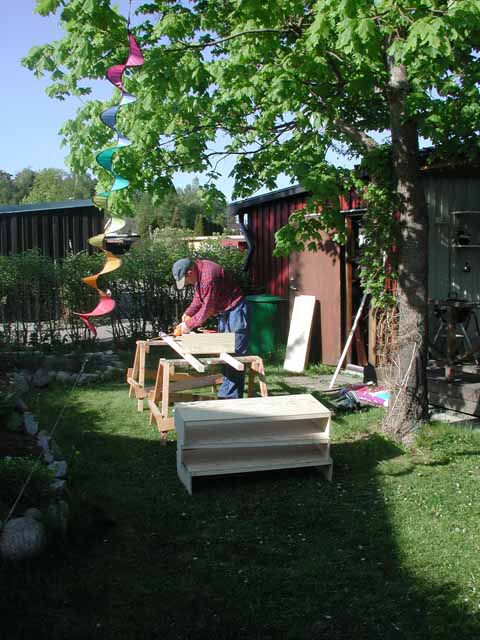
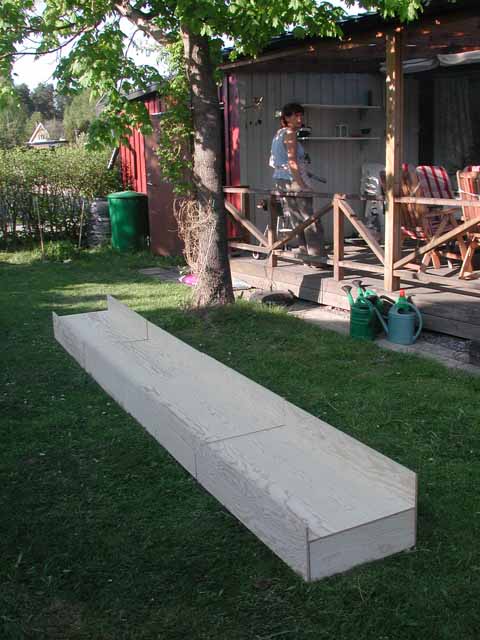
Here you see progress from May 20, 2007. To
the left you see me out there in the garden putting together the 4 module cases.
The
front and back
is raised deliberately. This as the tracks are running below the normal ground
level (see picture above). I will cut the front and back down unevenly
so that it looks more natural. To the right you see al the 4 modules lined
up after each
other for
coming action.
Here you see a picture taken May 18, 2007 where i have revisited
the layout based on the layout above and experience from module-runs.
It is important not to cram to much turnouts and action on a to small space
as per below. So I have decided to do the complete (slightly revised) Gliesmarode
layout from above, spread over 4 modules with a length of 1 meter each.
The picture above
shows a small section to the right where I have placed a couple of engines
and cars to get a feel for the space needed. As you can see I have also placed
a Märklin crane 7051 on the module. In the picture you see a ribbon ruler
(in yellow) that shows where the modules are going to be split. They are all
48
cm deep.
Below you see a couple of pictures from my early (Nov 2006)
track layout and with tornouts on a piece of board. The track material is all
from
PECO
of type
Code
75.
I had to redesign the above layout slightly to be able to meet the VM/MMM-module
standard (read spec
here). Also I feel that I want to have a yard where me and my fellow module-railroaders
will benefit from the module.
In general, you can terminate tracks on this module, if
there is not match to neighbour modules. Giving you more or less "dead
ends"
to put rolling material if needed.
The module is split up in two sections with a lenght of 1 meter
each and being 48 cm deep. As you can see from the picture above, this is not
a station but rather a yard to split up traffic into different directions.
In modulmakerterms you could call it a "Cross-over-module". The only housing
on these modules will be them seen in the picture above. The tower for setting
turnouts
and signalling
and some sheds/workshops
for
dressins
used by railwaymen.
Pls give me feedback (tilman (&) thulesius.se) with your
comments to the designs.

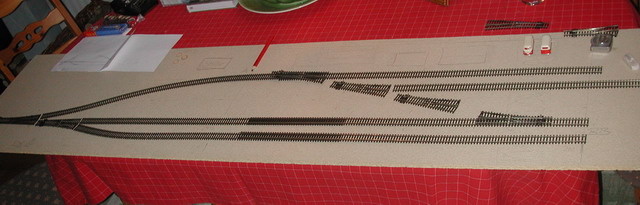
A . First step, pritty close to the prototype ...................B.
Here I have a track-position AA in the mid-board-cut and far end. Here I also
have A to the front
B. But from another angle. You see that I have a passing track from A <->
B(B). Looks quite nice. 7 turnouts
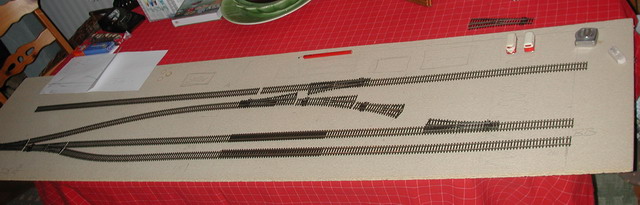
C. Here I have only track position A in the mid board cut. Also i have a tournout
for a track between position AA and BB to the right. I would say that it is
ok, but a bit crammed for traffic. A lot of traffic needs to pass track position
A. 7 turnouts
D. Very close to layout C. Though here I do not have track position A out
to the left.. 6 Turnouts
E. Back to havign Track position AA in the mid board cut. I still have Track
position AA to the right (though flex-track missing in this picture). 7 turnouts
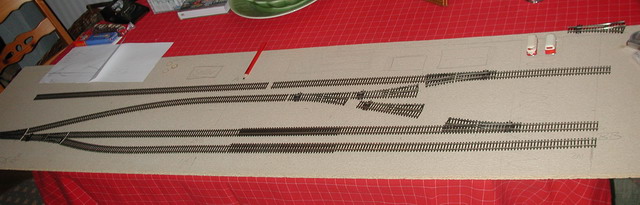
F Rather much the same as E, matter of tast what you like the best.. 7 Turnouts
here
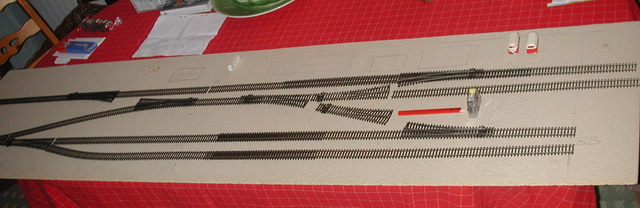
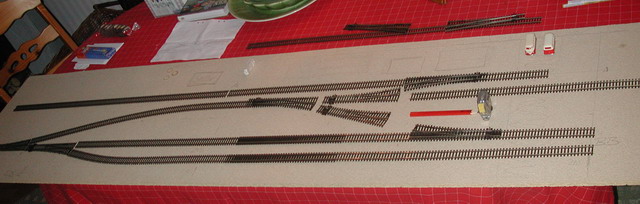
G My personal favorite. Here
you have a turnout up to the left to get in from track position A. The red
pen indicates a small piece of track Now we have 9 turnouts on this module....!
H Here I have omitted the way out to track position A to the left.
So what is your favorite ?? Pls give me feedback ( tilman (&) thulesius.se
.